Disclaimer:
The content of this article reflects the author’s personal views, thoughts, and ideas only.
It is provided for general information and discussion purposes only.
It does not constitute professional advice and should not be relied upon for decisions involving safety, rules and regulations, compliance, engineering, technical matters, automotive issues, insurance, or financial matters. All opinions expressed are solely those of the author.
Product details, prices, and business information are based on publicly available sources at the time of writing and may change without notice.
Mentions of specific products or businesses do not constitute endorsements. For more details, please refer to this website’s [Privacy Policy] and [Legal Disclaimer].
Why Quality Headlights Are So Important

The importance of having quality headlights will not be lost on you when you take your first night time drive in your first car. For anyone who spends any significant amount of time driving around in the dark, high performance lights that are properly adjusted for your vehicle are essential.
Most of the time, driving at night and using the headlights that came with your car will be trouble-free, and this may be because your night time driving is typically limited to driving around in your residential or town areas.
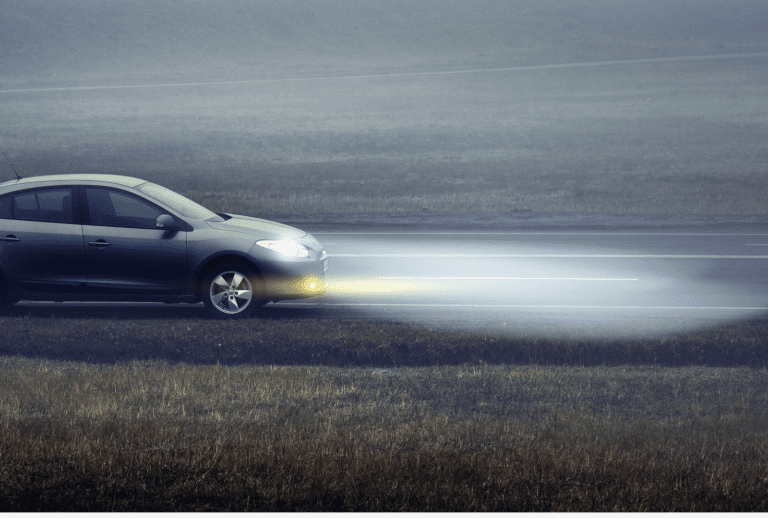
When you start driving at night on country roads, you will quickly realise how important it is to have high-quality, properly aligned headlights.
The first time you don’t notice a pedestrian, jogger, kangaroo, wombat, or some wandering livestock on the side of the road or actually on the road in front of you will give you a huge scare.
Hopefully you will notice the danger up ahead in time, and your car and whoever or whatever was on the road ahead will survive the experience unharmed.

If you believe your lights are bright enough but can’t figure out why the road ahead of you isn’t well lit, you’ve probably been lighting up the trees more than the road. You’ll probably realise this once you get back on the road.
Your lights are obviously not properly aligned for some reason, and when this occurs, it is not only dangerous for you due to poor visibility, but it is also dangerous and distracting for drivers in front of you and oncoming traffic.
There are a few reasons for this, but there’s probably not much you can do about it now on the side of the road, and since it’s not safe for you to continue, turn around, go home, and get your lights sorted out tomorrow.
One of the reasons your lights are pointing too high is that your vehicle may have been involved in a front-end collision at some point, which may have altered the angle of your headlights or cracked the casing that holds the light in place.
The angle of your headlights may have changed due to time and vibration, and it’s possible that the entire headlight assembly was replaced in the past and was never properly set-up.
However, the most likely reason your headlights aren’t shining in the right direction is that the back of your car is loaded down, either with cargo in the boot or a trailer you are towing.

If you are going to be towing a trailer or carrying heavy loads in your boot on a regular basis then you may need to get self-levelling shock absorbers installed.
If you weren’t weighing down the back of your car, don’t worry; adjusting your headlights isn’t too difficult but it can be very tedious at times, and every car is different. If you can afford it, take your car to a reputable mechanic and have them do this for you; otherwise, if you want to try it yourself, here are some steps to help you.
The first thing you need to do is to ensure your vehicle is level; if it is not level, you will be unable to align the headlights correctly.
Make sure your car’s fuel tank is at least ½ full, then take out any heavy items from your car.
Now you need to make sure that all four tyres have the same pressure in them. You may need to purchase a 12v air compressor from an auto part store, which could cost around $100, or you could simply purchase a tyre pressure gauge for around $25 and then let down the pressure in tyres to get them all at the same pressure, which you will naturally pump up later at a service station, etc.
Check to see if your suspension is in good working order and isn’t causing your car to lean to one side more than the other; if this is the case, take your car to a suspension specialist workshop or a reputable mechanic to have this problem resolved.
Checking the alignment of your headlights
To begin, check to see if your vehicle has built-in bubble levels to help you align the headlights. Some manufacturers provide vertical and horizontal bubble levels to help you determine whether your headlight aim is correct.
They are frequently found on the top and sides of the headlight unit. You can adjust the aim until the bubble is in the centre of the level. Most cars you will come across probably won’t provide any visible alignment indicators; some might only provide vertical or horizontal bubble levels.
It’s also crucial to remember that some cars have control knobs inside on your dash or other panels for adjusting or levelling the headlight settings. To properly adjust your headlights, make sure the headlight position adjustments in your car is in the neutral or middle positions. For detailed instructions on your particular vehicle, consult your service manual.
Find a level spot with a plain flat wall that you can drive up to, then turn on your lights and move the car as close to the wall as possible without hitting it.
Now hop out of your car and mark both locations of the centres of your low-beam headlights with a strip of painters or masking tape by making an X on each side and run a long strip of tape that runs through both centres. Also run a vertical strip through the middle of the X.
You now have the ideal Left/Right and Top/Bottom positioning for your headlights.
Now get back in your car and very carefully back up in a straight line 25 feet or 7.6 metres.
For the next part, it would help if you have a friend to help you, basically what you are going to do is shine your headlights on the wall ahead and make adjustments to your lights according to the tape marks you’ve made on the wall.
For most vehicles, the correct headlight height is when the top of the low beam shining on the wall is at or slightly below the height of the centre of the headlight lens, which you’ve marked with tape.
Expect the light pattern on the passenger side to be higher to illuminate road signs and lower on the driver’s side to avoid blinding other drivers.
Now, with you car safely parked, turn off your headlights, pop the bonnet and secure it in the upright position.
You will need a towel or clean rag to cover up one headlight at a time to help with the next task.
It’s now time to locate the headlight adjustment screws or bolts. Although each make and model is different, the adjusters are usually a type of screw or bolt located on the top and side of the headlight enclosure, one for vertical adjustment and one for horizontal adjustment. They are usually grey or silver in colour and contrast with the black housing of the headlights, though they are not usually labelled.
Grab the appropriate tool to turn/adjust them. To ensure that they are the correct ones, consult your owner’s manual. If your vehicle did not come with an owner’s manual, you can purchase one for around $50 to $60 at an auto parts store.
Hopefully you’ve been able to get a friend to help, have that person sit inside your car and turn the headlights on and off to help you get the right aim for each unit.
Turn the headlights on, pick on side to work on and cover the other side with your, this is just so you can focus.
If you’re not sure which adjustment bolt or screw is which, while keeping an eye on the beams on the wall, slowly turn one the screws or bolts to determine which direction it is adjusting; if it is not adjusting in the desired direction, return it to its original location and use the other screw.
Once you know which one is the vertical adjustment, adjust the vertical position of the light on the wall ahead of you. The vertical position of the most intense part of the light should be even with the horizontal tape line you made on the wall.
In a similar sense, as you’re adjusting the horizontal position, aim to move the beam so that it’s aligned with the vertical line you made through the X.
The next step is to take a test drive at night, preferably in a quiet and safe environment such as an empty parking lot, a quiet street, or a peaceful country road. Drive slowly and keep an eye on the position of your headlights. The passenger side headlight should be the brightest on the road shoulder.
Hopefully you are all set now but if one or both lights are still out of alignment, either repeat the process or take your car to a reputable mechanic who can finish the job for you.
If the
intensity of your lights fades or one of them fails later on, it’s time to
visit your auto store and buy some new globes. Your store representative will
be able to determine what type of globe your vehicle requires from your car
rego or make/model, which could be H1, H3, H4, H7, H11, HB3 or HB4.
Brands
like Calibre and Narva sell globes in packs of two, which can sometimes include
new globes for your parking lights, and that’s the route I usually take.
There
will be blue and white light options, as well as a variety of intensities to
select from.
Replacing
these globes can be a difficult task for a novice, and it is a task I despise,
so I recommend that you buy the globes you want and then have them fitted for
you by a reputable mechanic or maybe a friend that doesn’t mind helping you.
If you
want to have a go at it yourself, here’s a
pretty good process you can follow from Supercheap
Auto.


[…] https://www.glzwoodw.com/your-headlights/ […]
[…] Post navigation ← Previous Post […]
[…] Youtube Linkedin Tumblr Reddit Link Pinterest Instagram ← Previous PostNext Post […]